Mac Mini Media Server - Part 1: Setup & Configuration

Transforming Your Mac Mini into a Media Center
For a considerable period, Apple has advocated for the Macintosh to serve as the central component of a home media system, a vision that gained significant traction with the introduction of the Mac Mini. Its reduced footprint, affordable price point, and the inclusion of FrontRow make it an ideal device to connect to your television for enjoying previously recorded shows, such as episodes of Lost.
While Apple has since released the AppleTV, a popular choice for many, a fully functional computer offers capabilities beyond those of the AppleTV. Specifically, the AppleTV restricts playback to locally stored movies or those streamed from iTunes. This limitation presents a challenge for users with extensive collections – perhaps 300 GB – of AVI files residing on a dedicated server. Consequently, discerning users will likely find the Mac Mini a more suitable option. Furthermore, you might already possess a Mac Mini that you wish to repurpose.
Initial Configuration
The initial step involves positioning the Mini near your television and establishing a network connection, ideally through Ethernet. Although the Mac Mini includes built-in Wi-Fi, FrontRow’s network streaming performance over a wireless connection is often suboptimal. My setup includes both the Mini and the server connected to a gigabit Ethernet switch. While gigabit Ethernet represents a slightly higher investment, the resulting speed improvements are noticeable when streaming high-bitrate content.
Next, you must physically connect the Mini to the television. This requires two cables and potentially an adapter. Apple offers an adapter for $20 USD, which converts DVI (Digital Video Interface) to either S-Video or RCA video output (S-Video is recommended). If your television has a DVI input, verify its availability first. Once connected, you should be able to power on the Mini and utilize the television as a display. Audio connectivity is also essential. Typically, this involves connecting the audio output to the television, though your setup may differ. A 1/8th inch stereo to dual-RCA converter cable (available at most electronics retailers) is needed. Connect the 1/8th inch end to the Mini’s headphone jack and the other ends to the appropriate audio inputs on your system. Test the audio by playing music through iTunes.
VNC Server Implementation
Our goal is to control the Mini solely with the Apple Remote. Having to retrieve a laptop while relaxing on the couch to change an episode of The X-Files is undesirable. However, the remote offers a limited interface. To manage the Mini without a physically connected mouse, we will employ VNC. All Macs include a VNC server called Remote Desktop, configurable through System Preferences. However, this server has limitations, and OSXvnc is a superior alternative.
Installation of OSXvnc is straightforward. Download the DMG file, mount it, and drag the OSXvnc.app file to the /Applications folder.
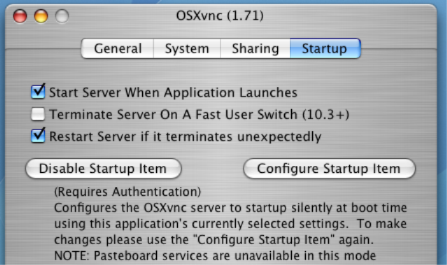
Launch the OSXvnc application and establish a password. Then, navigate to the "Startup" section and click "Configure Startup Item". After authentication, OSXvnc will be installed and running on your Mini. Finally, allow VNC traffic through your firewall. Open System Preferences and select "Sharing". Choose "Firewall" and click "Add...". Select "Other" for the port name, enter "VNC Server" for the description, and input 5900 for the TCP Port. Leave the UDP Port blank. Click OK and ensure the service is enabled.
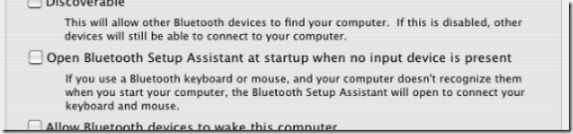
You should now be able to connect to your Mini from any computer (Windows, Linux, etc.) using a VNC client, provided you know the Mini’s IP address. Successful connection allows you to disconnect the mouse and keyboard and control the Mini remotely. However, Macs require input devices to complete the boot process. Without detected input devices, they continuously scan for Bluetooth connections, potentially interrupting the boot sequence. This can be disabled in System Preferences. Go to the "Bluetooth" section and uncheck "Open Bluetooth Setup Assistant at startup when no input device is present". This will prevent the setup wizard from running indefinitely during startup.
Utilizing FrontRow
All contemporary Macs include "FrontRow," a dedicated application for controlling iTunes, iPhoto, DVD Player, and QuickTime using your Apple Remote. Accessing FrontRow is straightforward.
- FrontRow is intuitive to navigate using the + - and << >> controls on your remote.
- Play/Pause selects a menu item, and menu navigates up one level.
iTunes movies in your library are accessible from the "Videos" section. Additionally, movie files stored in your "Movies" folder (within your home directory) will appear under Videos -> Movies in FrontRow. We will leverage this functionality in the next section to store our movies on a separate server.