Customize Ubuntu Kernel: A Step-by-Step Guide

Customizing Your Kernel: A Comprehensive Guide
Kernel customization isn't a task for all users. It's crucial to acknowledge that attempting this process carries the risk of system instability. However, there are compelling reasons to tailor your kernel to your specific needs. You might aim to streamline your kernel, including only the essential services, particularly beneficial for servers or dedicated devices with limited requirements.
Furthermore, kernel patching may be necessary to enable support for hardware not natively recognized by your current kernel version. This article focuses solely on the customization aspect, not the patching process. A subsequent article will detail kernel patching techniques and explore practical scenarios where it proves advantageous.
Determining Your Current Kernel Version
To begin, identifying your currently running kernel version is essential. This can be accomplished using the uname command.
$ uname -r 2.6.17-10-generic
Installing Kernel Source and Dependencies
Next, you'll need to install the Linux source code corresponding to your kernel version. In this example, we're using the 2.6.17-10 kernel, so the installation command reflects that. Adapt the kernel number to match your system's configuration. Additionally, installing the curses library and other compilation tools is necessary.
sudo apt-get install linux-source-2.6.17 kernel-package libncurses5-dev fakeroot
To ascertain the installation location of the Linux source, the dpkg command can provide details about the package's contents.
$ dpkg -L linux-source-2.6.17
/.
/usr
/usr/src
/usr/src/linux-source-2.6.17.tar.bz2
/usr/share
/usr/share/doc
/usr/share/doc/linux-source-2.6.17
(trimmed)
Preparing the Compilation Environment
As the output indicates, the source code is installed in the /usr/src directory as a compressed archive. To simplify the process, we'll transition to root privileges by opening a new shell using sudo.
sudo /bin/bash
Change the directory to the source location and extract the archive. You may need to install the bunzip2 utility if it isn't already present on your system.
cd /usr/src bunzip2 linux-source-2.6.17.tar.bz2 tar xvf linux-source-2.6.17.tar ln -s linux-source-2.6.17 linux
Configuring the Kernel
Copy your existing kernel configuration to serve as a base for the custom compilation. The backtick ` character is located below the tilde ~ key.
cp /boot/config-`uname -r` /usr/src/linux/.config
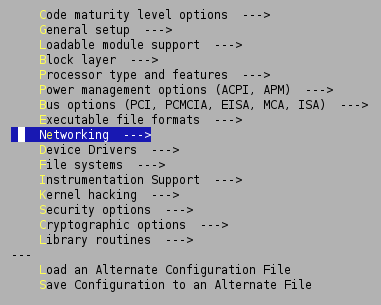
Now, launch the configuration utility to customize the kernel:
cd /usr/src/linux make menuconfig
Within the utility, load the existing .config file as a starting point. Navigation is straightforward, with a legend available for guidance. For instance, we can explore the Networking category.
Removing Unnecessary Modules
Consider the inclusion of Amateur Radio Support. Pressing the ? key reveals detailed information about this option.
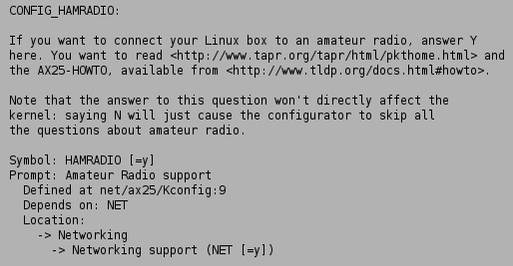
If this feature is irrelevant to your use case, disable it by pressing N. Once you've made your desired modifications, exit the utility and save the configuration.
Compiling and Installing the Kernel
Before compiling, execute a 'make clean' to ensure a pristine build environment.
make-kpkg clean
Initiate the kernel compilation process. Be prepared for a lengthy operation.
fakeroot make-kpkg --initrd --append-to-version=-custom kernel_image kernel_headers
This process generates two .deb files in /usr/src: the kernel image and the kernel headers. Install these packages using dpkg. The filenames will vary depending on your system.
dpkg -i linux-image-2.6.17.14-ubuntu1-custom_2.6.17.14-ubuntu1-custom-10.00.Custom_i386.deb dpkg -i linux-headers-2.6.17.14-ubuntu1-custom_2.6.17.14-ubuntu1-custom-10.00.Custom_i386.deb
Rebooting and Verifying the New Kernel
Reboot your system to activate the new kernel. Upon successful boot, verify the kernel version using uname.
uname -r 2.6.17.14-ubuntu1-custom
Further articles will delve deeper into kernel customization techniques. Stay updated by subscribing to the RSS feed. This guide was informed by resources available at HowtoForge, a valuable source for advanced Linux tutorials.